Aside from exposure composition is probably the most important aspect in photography. If you can't create, yes you need to create a picture it just doesn't happen, something that will grab interest your pictures will always be of the point and shoot variety. When you start learning and using the rules of composition you will add interest to your shots, and when you understand the rules well enough you will know when to break them. Of course rules are made to be broken, but it should be for a specific reason, rather than just on accident.
Some of the rules we are going to talk about have been around long before photography, I'm not an art history buff, so I don't know when they came about. Artists have been utilizing these rules for a long time, and so it was only natural that photography follow these rules as well. If you have taken art classes, I haven't, you may find some of these very familiar, if not, no worries you can learn them now.
I actually found an online version of a Kodak video I watched in my photography class about these rules, and rather than trying to go take my own pictures to show as examples I will just leave a link at the end of each section to the corresponding section in that tutorial, because they already have some great examples. The table of contents, so to speak, of the tutorial can be found
here, or you can find the link to the rules of compositions on the side of the blog under the helpful links section.
Simplicity
You've all heard the acronym K.I.S.S., right? Keep it simple stupid. Well this works well for photography as well. The more that is happening in your shot the harder it is for us to know what the subject is. So keeping a shot simple can greatly improve it. Usually the simplicity comes in the background of the shot. There are a couple of ways to keep things more simple, one is using the aperture that you're so good at now, right? If you use a shallow dof, throwing the background out of focus, it makes it easier to pick out the subject and makes the shot more simple. The other is to just use a simple background, don't put your subject in front of something that is really busy, but rather something simple, like a nice blue sky, or a single colored, not too bright, wall. Try to find ways to make the background more simple and our eyes will more easily pick out the subject and your pictures will start being more interesting. This is one of the simplest rules, but it is really powerful.
Rule of Thirds
The rule of thirds is sometimes also known as the golden rule, or golden ratio. The golden ratio side of it might be complicated, but the rule of thirds should be easy to understand. The golden ratio says that if you take a line and divide it into two, the ratio of the shortest segment to the longest segment should be the same

as the ratio of the longest segment to the whole line.
The easy way to look at this in photography is to imagine that your frame is split up into nine equal portions, and you should be trying to place your main subject on the lines or intersections of the lines.
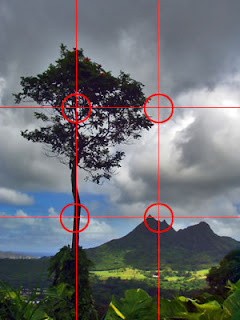
So in this picture we see the frame divided up by the lines, and the intersections are circled. You should try to get your subject, and other things as well divided into thirds. Notice the branches of the tree are on the top left circle, and the tree itself follows the left line. Also the background is split in thirds, the ground fills up the lower third leaving the sky to fill the upper two thirds. This picture is a perfect example of how to use the rule of thirds.
If you look around you will see this rule in a lot of places, watch TV for example, the eyes are usually placed in the top third of the frame. Nobody is sure why this makes things more interesting to us, but some speculate that the number 3 has some specific meaning to our brains and that is what makes this great.
Another thing to mention, this isn't a rule but I think this is the best section to put it in, is to be careful about leaving enough room in the frame for the action of the shot. So for example if you are taking a picture of somebody riding a bike, and you position them with the front of the bike right up against the edge of the picture this is usually thought of as bad. It is better to leave some room in front of the bike, so the action, or movement, has somewhere to go, so it doesn't make us feel like they are just riding off the frame. The same goes for eyes, if you take a picture of somebody that is looking off, so not straight at the camera, you usually want to leave some room for them to look. Usually thinking about the rule of thirds will help you in these situations, but keep them in mind.
Lines
Lines including shapes have always been used in artistic works. I don't know why they are so effective, but our minds are just mathematically oriented, even if you don't think they are. We see patterns and shapes everywhere without even realizing it. Utilizing this will make your pictures better. One of the best things to use lines for is to lead the viewer to your subject. If there are lines going right to the subject it will help us understand your composition and we will be more interested. Some lines that really add interest are S-curves and C-curves. If you can get something in the shape of an s, hopefully one end is right in the corner of the frame, or a c this really adds interest, again I don't know why, but it does. Another really powerful line is the diagonal line, diagonal lines can really bring out the subject in the photo.
Shapes are also included in this discussion, shapes are important to find. The most common, is the triangle. Think about portraits that you have had taken, especially with three people, the photographer probably tried to create a triangle out of your heads. Geometric shapes in your pictures will just add to the overall composition.
Balance
The tutorial link that will be at the end of this section will talk more about shapes, which goes along more with lines in my opinion, but I see their place here as well. I'm going to talk more about what I see in terms of balance. One of the biggest things I look for in terms of balance is whether or not I could really make two pictures out of the one I just took. For example, if you have four people in the picture paired up in twos, there is a great example of this in the link, then you really could have just taken two pictures, one of each of the couples. If you really want the four together, you need to do something visually so it doesn't feel like two pictures. The other big thing I look for in balance is a way to lead your attention to the subject. So there is a picture in the link with the stone heads, they start out small and get bigger and bigger, until we are at the closest one to us, which is the main subject. Another thing to look for in balance is just to throw things off balance by grouping somethings together and then having another thing by itself, this will really throw the attention to the lone object.
Balance is still one of those areas I need to work on, so I don't recognize it as quickly as I should. The key is that usually symmetry isn't interesting, so making things asymmetrical will usually make your pictures better.
Framing
Although Janae thinks it is cool to have an actual frame in the picture to add interest, you don't need a literal frame to add the concept of framing to your shot. Framing will gives us some bounds and help us to more easily focus on the subject. Think about what a picture would look like on your wall without the frame and matting around it, I bet it wouldn't look as good, and if the background matched your wall it would be hard to tell where the picture actually ended.
When thinking about framing you don't necessarily need all four sides to be framed, even just one side will add interest. Framing is usually done with other objects, trees, bushes, a flag over head, a branch, a wall, anything that will frame your subject will do. I think this is a simple enough concept that I don't need to talk to much about it, just check out the example pictures in the link and you will quickly understand what I mean.
Mergers
No I don't mean company mergers, I mean objects merging with your subject. These are almost always bad. These kind of pictures are always used for a good laugh, if you watch Headlines on Jay Leno you may see him with these types of pictures quite frequently, you know, the one with the guy posing for the camera and behind him on the wall is a moose head, but all you see is the antlers sticking out of the guy's head. Now do you know what I mean? Usually things in the background sticking out of your subject just look bad, or funny, like any rule this can be broken, but you better do it on purpose.
Mergers are also described in the link as being something cut out incorrectly. They have a picture of a big group and somebody on the left is cut halfway off, this is another type of merger you want to avoid. When taking pictures of people try not to cut them out, if you do need to cut parts of them out, don't cut out on joints, knees, wrists, elbows, necks, those are all bad places to cut.
The last merger is just your subject blending in with the background too much. A nice red shirt on a red background will just loose your subject in the background, we will just see a head then some legs, this isn't a good thing.
Most of the time mergers can be avoided simply by moving to the side, or up or down just a little bit. Again, keeping your shot simple will eliminate mergers as well. Another topic that goes along with mergers is just pay attention to what is in your picture, you need to see the whole composition not just the subject, like I said before you are creating the shot, it isn't just there. There are seven places you should always look before you take a picture, and this will really help with eliminating mergers. At first you may have to think about it, but before long your eyes will just always do it and you won't even know it, and it takes less than a second. Always look in the four corners, the foreground, the subject, and the background. Make sure only things you want in the picture are actually there.
Assignment
Okay now its time for your assignment. For this topic I want you to take a picture showing a good and a bad example of each of the first five rules, everything up to mergers. Then I want one picture of a bad example of a merger, it is hard to show a good example of a merger, any picture without one is a good one, so we will just look for a bad one for that last rule. That is eleven pictures, but you're up to it, right? Besides how else will you learn without practicing? Again email me with the pictures or a link to where you posted them so I can link them here for others to see. Oh, and if you're reading this without having done the other assignments, espeically the one with the five shots of the same subject, then go back and do them, no skipping now.